|
|||||||
| Register | FAQ | Members List | Calendar | Today's Posts | Search |
 |
|
|
Thread Tools |
Rating: 
|
Display Modes |
|
|
|
#1
|
||||
|
||||
|
Jim, yeah buddy on the drills. I to have had issues with drilling polycarbonate before. The company will provide (sell) me the bits that I need. Interesting enough they also will use a Unibit step drill for this material. I had never heard of this so I will find out more on this when I visit them on Friday.
More pictures were requested so here you go. The photos above are from my phone, not very good (I forgot the camera yesterday) so the owner of the place, Larry's Hanger, captured these fine photos for all you 337 addicts. Thanks Larry.
__________________
Herb R Harney 1968 337C Flying the same Skymaster for 47 years 
|
|
#2
 12-10-08, 03:18 PM
|
||||
|
||||
|
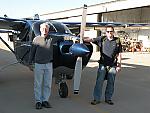
More photos from Larry at Larry's Custom Re-Furbishing Hanger. Hurry and schedule your project today, spaces are fill fast! That's Craig the Chief bottle washer (AI) on the project. We removed the door first, in doing so found the hinges a tad bit worn. Craig decided to look up the hinges for price and availability, one is around $200 but the other is like $2400 for just the door hinge!
__________________
Herb R Harney 1968 337C Flying the same Skymaster for 47 years Last edited by hharney : 12-10-08 at 03:28 PM.
|
|
#3
12-12-08, 01:06 PM
|
||||
|
||||
|
late in the game
Hi, sorry to be so late with my comments... I havent had much time for the computer lately! I did my interior work when my plane was in the avionics shop. Those black patches need to come off and the glue needs to be removed! I used a plastic scraper for the big stuff, then went to work on the glue and corrosion with an angle grinder with skotchbrite disks. Then zincked the whole thing before installing insulation! In retrospect I would have somebody who is good with paint shoot the zinc on every thing made of metal then a clear coat on top to prevent peeling! Also the foam insulation is good stuff, but on the fire walls and maybe the roof over the front seats you should use leaded vinyl then foam. If you keep the double windows then you should have a pretty quiet plane! If you have questions about where to get TSO'd insulation at lower prices contact Ed Cabella at Flight Seating 817.338.1655 he did my upholstery work and I am very happy with it and what it cost.
I installed tinted windows on the sides and have slightly tinted windscreens and am very happy with the results, though the windows are pretty dark at night! I also used Aero Enhancements glairshield lighting and had them make overlay pannels for all of my panels includeing vent surrounds and inbetween the throttle levers! Good luck, Keep us posted _travis
|
|
#4
12-19-08, 10:41 PM
|
||||
|
||||
|
Here are a couple of photos that show the removed windshield and the trim cuts that were required when the original was installed. I don't understand why Cessna didn't just use holes here instead of cutting out slots. I wonder if they would have used holes they may have been able to eliminate the center strip (it is not really a true center post because the w/s is one piece) because the holes would secure the windshield to the cabin without the center strip. Must be a reason, Cessna is smarter than the average, right? That is the felt that is still on the edge of the w/s.
The inside center strip was really difficult to remove. I am on Christmas Vacation, more to come next year :-)
__________________
Herb R Harney 1968 337C Flying the same Skymaster for 47 years Last edited by hharney : 01-01-09 at 01:14 PM.
|
|
#5
01-01-09, 01:03 PM
|
||||
|
||||
|
Before Christmas break we started a couple projects; the BAS seat belt system and inspection of the fuel cells. I have a small stain under the right side aux that was due for some inspection. Because the aircraft is going to paint after the interior is complete it only made sense to tackle the fuel cell inspection now. I have some really good and friendly help from the owner of the facility. Thanks to all involved.
The photos below show the flap motor and gear mechanism. I thought I would shoot some pictures of this for reference if nothing else. The insulation that will be going back into the cabin is compared with the original Filter Glass that Cessna installed. I will be cutting and fitting the new approved foam for installation on the rear firewall and ceiling to start with. We will see how much time and money permits for the rest of the cabin. Where there was indication of corrosion behind the linoleum patches, the areas are being treated with Alumiprep and then rinsed with water. While the area is still wet I apply Alodine 1201 using a spray bottle and let it set in. Then rinse again with water and let it air dry overnight before treating the area with Zinc Chromate paint. Each area will be patched with the 1 inch foam to replace the original linoleum. The foam is attached with Pliobond adhesive. This is an approved adhesive that will not promote corrosion. The linoleum has salts in it, therefore when the Cessna adhesive allows moisture to migrate between the skin and the patch it corrodes. The patches are there for a purpose and that is why the foam will be the replacement item. These patches deaden the skin from vibrations that cause cracking in the skin. Thanks GMAS for the process just described. That's the trick, just takes a ton of time. Not really all that expensive for the supplies, just time, time, time. More insulation pictures to come later. The other photos show the initial installation of the BAS restraint system for the pilots. The A/I is drilling the holes through the spar and roof to attach the shoulder belt nurse reel to the bracket provided by BAS. Again, because we are going to paint, we went ahead and buffed off the paint in the attachment areas for the BAS brackets. This was a little scary seeing a drill bit pushed through the spar and out the roof. I hope those holes are in the right place ;-) More BAS install photos to follow. Well it's New Years Day and I think I'll hop in the Audi (Tammy's car) and take a visit to Larry's Hanger. It's been 19 days since I have seen my project. Stay tuned!
__________________
Herb R Harney 1968 337C Flying the same Skymaster for 47 years Last edited by hharney : 01-07-09 at 03:31 PM.
|
|
#7
01-01-09, 03:26 PM
|
||||
|
||||
|
Quote:
Quote:
|
|
#8
01-01-09, 08:31 PM
|
||||
|
||||
|
Other windshields have holes that also allow expansion without the center strip. Like the C206, it is a single piece with no strip. If you had the holes at the top and pushed forward in a dive the w/s would not blow out, wouldn't it stay in place?
__________________
Herb R Harney 1968 337C Flying the same Skymaster for 47 years
|
|
#9
01-01-09, 09:04 PM
|
||||
|
||||
|
All Cessna installed windshields have the notches in the upper edge from the factory, not just the 337 series.
I'm guessing that this makes production faster, thus less expensive. Like I said earlier, if they had holes drilled, then the holes would have to be located, the windshield removed to enlarge the holes, and then re-installed, it there was enough edge distance from the enlarged holes to the edge of the material. If there wasn't enough edge distance, then that plexi would be scrap, and would have to start all over again. I don't know what stresses there are on a 206 w/s vs a 337. What is the VNE on the P206/U206 airplanes? That could be a clue. Is a 337 wider, what is the surface area of the two windshields?
|


 Hybrid Mode
