|
|||||||
| Register | FAQ | Members List | Calendar | Today's Posts | Search |
 |
|
|
Thread Tools | Rate Thread | Display Modes |
|
#31
 02-04-21, 01:19 PM
|
||||
|
||||
|
Quote:
The Garmin G5 is certified for the Skymaster, and most light twins. Not that I'm a Garmin fanboy by any means, but Garmin wins this one (as far as twins go!). 
|
|
#32
02-04-21, 01:28 PM
|
|||
|
|||
|
Quote:
|
|
#33
02-04-21, 10:12 PM
|
|||
|
|||
|
I have a Uavionics AV-30 and a couple years ago asked them to include Skymaster on their AML list when they went for their certification. I got an email from them advising skymaster was approved before I took delivery of my certified AV-30 and have spoken with them throughout certification process.
However, in terms of driving legacy autopilots discussed on this thread, it is of no help.
|
|
#34
02-04-21, 10:20 PM
|
||||
|
||||
|
Quote:
Last edited by mshac : 02-04-21 at 10:31 PM.
|
|
#35
02-04-21, 10:32 PM
|
||||
|
||||
|
Quote:
|
|
#36
02-04-21, 10:45 PM
|
|||
|
|||
|
I understand the comments and appreciate them.
I had noted their AML list did not include 337 when I checked their website few weeks ago and have been meaning to call them to see what's up. But the e-mail saying "Cessna 337 has been added to the AML list" exists. I just pulled it up again to check my memory. So I will call to clarify. Avionics installer was also comfortable with it when we ordered unit and conferred with them. However, with caution I have retained my OEM AI...plus it drives my legacy autopilot. I believe my personal next step beyond the legacy stuff I have would be an Aspen and STEC autopilot. Last edited by wslade2 : 02-04-21 at 11:00 PM.
|
|
#37
02-04-21, 11:25 PM
|
||||
|
||||
|
I talked to some senior guys at Garmin recently. They intend to add 337 to G500txi Engine Indication System to STC and GFC autopilot. When?? In the fullness of time is what I remember thinking...
|
|
#38
02-05-21, 09:53 AM
|
|||
|
|||
|
Garmin
Just a brief note on support of the Garmin G5s - I have two installed, and it is integrated with my GTN750 and my OLD Century IIB autopilot - and it works great - I could only be happier once they STC the GFC500 for the Skymaster!!!
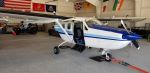
I have a bit of envy when seeing the GI275 in a friend's aircraft (cleans up panel nicely), however the large display and total functionality and safety of the G5 to an old aircraft is well worth the investment. I will note that I did the G5 install myself (and integration with the AP) and it works great! I had to retain the horizon that drives the AP, and the G5 HSI integrates beautifully. Let's keep pressure on Garmin to include the C337 on the GFC500 (or the 600) AML - they are including aircraft types that have far fewer airframes on the US register than the 337...I have let them know this by calling out those types! Jeff P.S. Compare and contrast the 2 aircraft panels - one from 1948 and one from 1966... Pretty good for some 'old girls' Last edited by JAG : 02-05-21 at 10:00 AM. Reason: Added Pictures
|
|
#39
02-05-21, 12:26 PM
|
||||
|
||||
|
panel
Jeff:
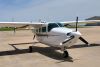
Quick question, did you have a new pilot side instrument panel made? I have the same year, just an earlier serial number, and my instruments are not lined up vertically like yours because the clock (same as yours) is mounted right above the yoke (factory hole) which pushes the bottom 2 instruments out so they are not directly lined up with the ones above. I will be installing 2 G5's this year and was wondering what to do about them not lining up vertically. Thanks! Tom Last edited by TomM : 02-05-21 at 12:40 PM. Reason: added picture
|
|
#40
02-05-21, 12:31 PM
|
|||
|
|||
|
Love your panel, I'm going to do the exact same thing with the mid cont m93 clock/USB + AV20s, as well as the G4 insight.
Quote:
|
|
#41
02-05-21, 06:01 PM
|
|||
|
|||
|
TomM
TomM,
I fabricated a new pilot side panel out of piece of 2024 T3 (I think it was 0.060" if I recall). I wanted to layout everything exactly as I wanted, remove a few things I no longer needed. I knew it was going to be a tight fit, so I traced out my old panel on some paper, and started laying it out using the old pencil and ruler. I had played around with some online tools, but I needed to be exact. Once I thought I had a pretty good layout, I transferred my dimensions to a sheet of Lexan, and using a hole saw, made a test panel. This was a key step in making everything work - as you can see from my photos, I had to do a lot of modification to the G5 mount plate to clear the other instruments and the panel mounts at the top. My goal was to get my '6 pack' as high on the panel as I could. Once I made the panel out of Lexan I installed instruments and installed in aircraft. From this I made some changes to my final measurements for the metal panel. Once I was happy with everything, I made my own metal panel, making the investment in a instrument punching tool (ATS 123C) and the instrument holes template (ATS T123C). Again, I considered the idea of using a local company with a water jet, etc, but this tool did a beautiful job!!! Again, test fitted everything and spent a day with my files customizing all the holes - then had it powder coated locally. This is not the first instrument panel I have done, and I would not do it any other way. Buying a few tools, some lexan on Amazon and some 2'x2' aluminum from Aircraft Spruce, was so easy, quick and allowed me to get it right the way I wanted it. I strongly encourage you to look at doing the same, so you can lay it out exactly how you want it. I am also happy I went with the flush mount of the G5s. Good luck! Jeff
|
|
#42
02-05-21, 07:51 PM
|
|||
|
|||
|
Aspen Choice
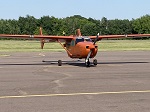
I went the Aspen Evolution route. The PFD and the MFD are both 1000's. I did get the synthetic vision. New software provided the backup battery necessary to remove the vacuum pumps, which I did. A few months ago I added a RCA 2600 to the panel so now I have three attitude indicators. The cost installed was less than $15,000, including the RCA 2600. It took two weeks down time and I am still waiting for the paperwork so I haven't flown it. On time and on price. I have a Nav O Matic 300 (oh boy!) autopilot, so no auto pilot at all. My GPS Navigator is a Garmin 530 WAAS. I still have to find a traffic and weather solution or ADS B in, as my out is with a Stratus which is not compatible with the Aspen. Right now I use an iPad running FlyQ and a DUAL XGPS 190 for ADS B in. Next is an autopilot solution and fuel management. Any suggestions for an autopilot? Also I just want to count the fuel used. Nothing fancy just want to know what's in the tank. Suggestions? Photo is by the installer and the film is still on the screen
|


 )
)
 Linear Mode

